Aug 24, 2012

Peir 1 Table and chairs


(I AM WORKING ON FINDING BEFORE PICTURES SO YOU CAN SEE THE WHOLE TRANSFORMATION)


Look how AWESOME this table is! I have had this table in storage and finally decided to update it. Sooooooo glad I did right!!? So heres what I did ......


These chairs were originally green and not a green that I wanted to keep around, so I painted them a bright white and then we went over it with the dark walnut from Minwax, and just rubbed it off real quick to achieve this dirty look.

 I LOVE THESE LEGS! dont you!!?

 Then on the top I used the Dark Walnut by Minwax also I did about 2 coats because this wood had been sitting in storage and was needing  big drink, it sucked that stain right in!

 AND THERE YOU HAVE IT!! SO EASY I PROMISE! THIS IS TRANSFORMED INTO THIS GORGEOUS BEAUTY!

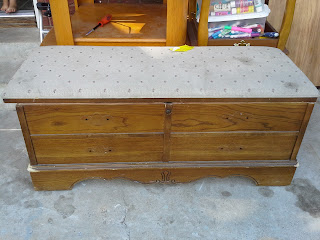
boutique chic cedar chest

                                 
I found this awesome chest at a local thrift store and I stood by it until I could get someone to come put a tag on it with MY name on it!!! I knew it needed some tlc but I didn't think it would take that much  work so I brought her home with me in the back of my lovely mini van! Yup I rock that all around town!


I went to the fabric store to see what fabric I could find and they didnt have anything I liked in the thicker stuff so I opted for a cotton cute blue. I first started by unscrewing ALL of the screws...

Then on the top I recovered it with some batting and a good ol staple gun, and taped off the chest...

I dont have any pictures of me in the painting stage ( i will get better at taking more pics) I decided to use some leftover grey that I had from our bedroom. I sprayed the hardware with zissners primer just to make sure it had a good stick on it. I then thought I would give it some depth and highlight some of it by putting some stain and wiping it off quickly! Lastly I sprayed it all with a clear sealer gloss from lowes, that you find in the spray paint section to make sure it would wipe away any stains on it because I thought it would have people sitting on it with dirty feet!! 

LASTLY I screwed in (or my husband) screwed in the top-it was heavy holding it in place! Sometimes you just gotta ask for some help! 

and TADA!!! A new chest for a reading nook and books or just for blankets or for whatever you can imagine!! Yay do you like it? If I can do it you can do it I PROMISE!!


RUSTY

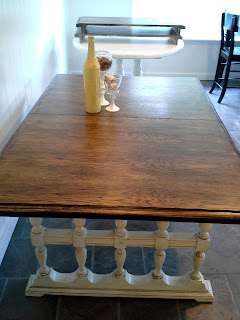
This is a story about Rusty. I found him and I FELL in love! Who couldn't look at those legs right!!? I was trying to think of what to do and I decided to just go with the normal dark stain with the dirty up legs so I taped off the top and flipped it so I could paint those legs and bottom really well. I used an antiqued white found at home depot and used a dark walnut stain to really dirty it up.


Then I flipped it back and got to sanding. I loved how this looked but I decided to stain anyway....
 BUT, look how shinny it was....It didnt really look great to me sooooo I RE-SANDED!
Then all I did was applied a CLEAR top coat made for wood made by deft. I really liked that stuff. It dries fast and is easy to apply!
And this is the finished product ...I felt like this table belonged in a rustic home hence the name RUSTY the top is gorgeous and you can see ALL the wood grain and it has 2 huge leaves that come with it so this is a giant of a table if you want it to be!


I like how because I stained it and then sanded it left a lot of darks and light colors. And that bottom tab I never resanded so it stayed the dark walnut.
There is my story of Rusty. He has since found a new home but, I will always remember you!!
In the back you can see that beautiful round table I have been working on...I will keep you posted!